| |

|

Gas
Tank / Skidplate Remove & Reinstall
This
will detail how to replace your old, rusted skid plate on an 83
Wagoneer (J series trucks have a different tank, I believe, as do
79's and earlier.) and how I prepped the replacement. Read through
the instructions first. If you have any doubts, prep the plate yourself,
but pay someone else to do the switch. Blowing up yourself or ruining
your Wagoneer is not worth the $65 labor that the dealer estimated
it would cost to replace it.
This is intended
for the reader who has never attempted something like this before,
therefore some of the the more experienced mechanics may find
some things rather obvious, but we were all once clueless before
someone else clued us in!
First, exercise
COMMON SENSE. I did all my work outside without any heaters, etc.
Disconnect the battery! Try to let your truck run out of gas,
if you can. Otherwise, buy a $0.99 siphon and siphon out the gas.
I tried to get mine to run out of gas, but got tired of waiting,
so there was still a little sloshing around, but not too much.
If there is a lot of gas in the tank, the tank will be very heavy.
You will need
to locate a suitable replacement gas tank skid plate (hereafter
simply called "plate"). I found one off of an 82 Brougham
Wagoneer. I've seen some different styles on some of the Wagoneers
(see above), so make sure you get the right style. The 83 model
year has a flat bottom with ridged channels and a bump near the
back with a water drain hole. Some of them also have three drain
holes near the front, too.
Once you find
your replacement, you can work on removal and prep of the new
plate at the same time. I will detail these in two separate sections,
starting with...
Plate Removal
- You can
invite a friend over to help and it will be much easier. I did
the project with myself, a floor jack and a board. Doable, but
not ideal.
- Open the
rear drivers side door. Fold up the seat and strap it on the
passenger side so it won't fall down. Lift the driver's side
carpet up and you will see a round plate. This is the access
panel for your fuel sender. Remove the panel (You will probably
have to drill out the rivets CAREFULLY. Leave one in, so it
will slide open. Disconnect the 2 fuel lines and the electric
fuel sender connectors. Tie up these lines so that they will
stay near this hole. It will also limit the amount of gas that
leaks from these hoses.
- Chock the
right side wheels on BOTH sides. You don't want your truck going
anywhere. I jacked up the rear axle so that the tire was an
inch off the ground and removed the left rear tire, as it gives
you easy access to bolts and nuts that must come off. I also
raised the left side of the frame near the front of the driver's
door. This gives you a more comfortable working space. Make
sure the jack stands are firmly in place BEFORE crawling underneath
your truck! Place the tire underneath the rear end of the truck.
If the truck should ever fall, it will rest on the tire.
- Underneath,
you will notice a row of bolts that hold the plate to the frame
rail. Remove the ones that are actually holding the plate to
the rail. Ignore the rusted out ones for now.
- Towards
the FRONT of the plate, there is a nut and bolt on the TOP of
the frame rail. This is a tight space, but it MUST be removed.
I used lots of WD-40 and some non-Kosher hammering on wrenches.
Once it broke free, it was very easy to remove. Be careful,
as your fuel and brake lines are running on the inside of the
frame rail.
- There is
a bolt on the front inboard side (not at the frame rail) of
the plate. This does NOT need to be removed yet. There is a
nut on the other side that will simply spin uselessly if you
try.
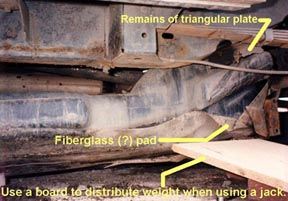
- As you
see the tank starting to sag, put the floor jack and board under
it. The board distributes the weight so you don't punch through
the plate and/or the tank. The tank is PLASTIC! Be nice to it.
- With support
in place, crawl under towards the rear differential. In that
area you will see two long bolts secured with nuts. Remove both.
I also removed the bolt and nut securing the metal line, as
it gave better access to the other 2 bolt heads. These also
required some pounding to break loose.
- Check and
make sure your support is adequate.
- Now, take
a look at the empty wheel well. Where the frame rail rises to
go over the axle, there is a triangular piece of metal. Remove
the bolts on the bottom and the RIGHT (or rear) side. Don't
try to remove the ones against the frame rail, as again, they
will simply spin uselessly.
- At this
point, your tank is free. It may or may not want to fall down,
depending on how bad your rust is!
- At the
rear of the plate there is a metal cover sticking out where
the 2 filler hoses enter the tank. Remove the 2 nuts and pull
off and SAVE the cover. If the hose clamp screw is accessible,
loosen the hose clamps around the hoses and remove the hoses.
If you have to cut the hoses (I did), be careful not to stress
the plastic tank. Also, check for availability of the hoses
(1" diameter and 1 1/4" diameter on mine. Yours, of
couse, might be different.) in your area. I found mine at NAPA
for $20 for 3 feet. You need 3 feet at the very minimum.
- With the
filler hoses off, lower the tank a little. What you are really
looking for is a controlled fall! If you can, lower it only
1/2 way.
- Now, remove
the vent lines at each end of the tank. I cut the hoses, as
I was going to replace them anyway. I replaced them with actual
fuel line, not vent line. I also used enough so that the next
time when the tank is dropped, the lines are long enough not
to strain their connections. If the rubber/plastic connectors
at the tank are rotated or stressed at all, you may need to
seal them as they will leak. (Mine did.) I don't know if these
are available gfrom the dealer or elsewhere. Again, be nice
to them.
- Once all
lines/wires are disconnected, lower the tank/plate assy. to
the ground. Slide it out from underneath the truck. The rear
is higher, so watch your clearance there! If your triangular
plate is still intact in the rear, it may be necessary to raise
the truck more to get the tank out.
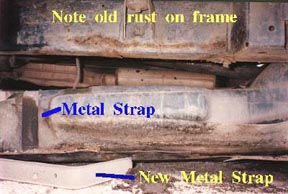
- Now you
will clearly see the two straps that hold the tank in place.
The rear strap has already been loosed on the inboard side of
the tank. The outboard side may also be free, depending on how
many bolts you removed there.
- At the
front of the tank, dig, yes dig, into the dirt in the space
near the front inboard side where the strap is. Mine had about
2 inches of accumulated dirt! Somewhere below is a 5/8"
nut which is attached to the bolt head that you saw earlier.
Either use a long socket or cram a wrench in there and get the
thing out. Lift that end of the bracket up. It will pivot at
the opposite side and eventually come out. You will see how
it works when you do it. Very easy.
- The tank
is now free to be lifted out. Try not to lift by the rear filler
hose necks, as they were not designed for that type of stress.
I set my tank on a floor creeper to move it around. This prevents
it from being scraped or bumped about. You may clean the inside/outside
of the tank as you please.
- With the
tank out of the way, now work on removing the triangular plate
that hangs off the frame rail near the wheel well.
- Salvage
any useful brackets from the old plate as well as the rear hose
cover that you removed earlier. If you have the FIBERGLASS pad,
save that! The '82 I got the plate from had a plastic bag-like
liner that seemed much flimsier. A replacement fiberglass pad
is ~$65 from Chrysler. Also save your nuts and bolts.

Installation
- Installation
is the reverse. (Haven't we seen that too many times in pseudo-shop
manuals?)
- First connect
your vent lines. The fuel lines that attach to the sender can
be reattached later, through the access hole. You will reattach
the filler hoses when the tank is in position. Don't forget
to put the fiberglass pad between the tank and the plate!
- Before
sliding the tank/plate assy. back in, attach the triangular
plate to the frame rail. The holes do not allow for adjustment,
so go ahead and tighten the bolts.
- When you
are reinstalling the tank, be aware of the extensions in the
tank. Two parts are designed to stick INTO the frame rail for
extra capacity! I was able to raise the outboard side and stick
it "into" the frame rail first, then raise the inboard
side. In other words, angle it in. As you do, watch the fuel
lines near the sender unit and make sure they are not pinched.
Clearance is tight there. To line up some of the plate and frame
holes, I used a screwdriver in the hole to align them, and they
clamped it in place with vise-lock pliers. Insert the bolt and
nut, remove the pliers and tighten. With the tank in position
and all bolts/nuts securely tightened, attach your filler hoses.
Fill 'er up and give it a road test! Check for leaks at the
hoses.
- You're
done! Go out and enjoy your newly repaired Wagoneer, secure
in the knowledge that your fuel tank won't spontaneously drop
out from underneath you!
Replacement
Plate Preparation 
- When you
are looking for a replacement plate, really pound on it and
test to see if it is good. Reject those that have been sitting
on the ground for years or those that show ANY rust-through
ANYWHERE. You want as perfect a plate as you can find. I picked
mine up for $20.
- Make sure
you get BOTH brackets and the triangular piece of metal at the
rear end. If they'll let you, grab any bolts/nuts that come
with it, too.
- It is about
4 feet long, so it will fit in a regular passenger car's back
seat.
- When you
get it home, wash it with a garden hose capable of giving a
sharp stream of water to blast away all the dirt and grease.
Let it dry.
- Now it
is time to become one with your electric drill and a wire brush.
Wire brush the remaining grease/dirt and rust. The plate is
actually plated, so don't remove the plating if you don't have
to! The large bracket in the rear-inboard side is not plated,
so you will probably have to scrape that part pretty good. Be
sure to get your inside corners real good. When done, wash off
dust with water. Now, go into the kitchen and steal your dishwashing
soap. Pour some in a bucket with water and wash the plate using
an old wash rag. You are now wanting to remove all the grease
and oil grime that is on it. This will prep the surface for
the rust converter. Let it dry.
- Whatever
brand you use, stick with the same brand for all your products.
In theory, this will ensure compatability. I used Duplicolor's
Rust Converter, Primer and Spray-In Bedliner. Around $5,$4,
and $7 respectively.
- Follow
the directions for all. The rust converter takes about 30 minutes
or more sometimes to turn from clear to black. Be patient. I
let mine dry for a few days. Next, spray primer all over it.
Let dry for a day. Now, the fun part. Spray on the bedliner.
I would recommend an OSHA respirator, as the bedliner stuff
is REALLY nasty. I coated the inside corners really thick, so
it would seal the joints. I also added extra thickness in the
depression near the rear of the tank. (The one that is probably
rusted out on your original!) Do only one side at a time. Of
course, coat the bottom side really thick, too! If you can,
let dry for several days. Otherwise, you will chip and scrape
it off (like I did) when you reinstall it. Not too much of a
problem, as you can re-spray the outside later.
- I used
2 cans of the rust converter, 2 1/2 cans of primer and about
6 or 7 cans of the bedliner. Keep in mind that I also sprayed
my frame rail. Yes, the used plate is the cheapest part of this
project!
- If your
frame rail is rusted, treat it in the same way. Make sure you
really pound out all the remaining rust. Remember holes add
character. If your rail is really "iffy", you may
want to have it checked out by a frame shop!
Prepping the
plate is expensive and time consuming, but you don't want your
replacement to rust out again, and you certainly don't want to
have to remove/replace it again!

Ethan B.
 
|
|

|
