|

Front
Tow Hooks
 Have
you ever been stuck and needed a front-end pull and couldn't get
it? Ever had the need to pull someone from the front and couldn't?
Well, if you couldn't before, because of lack of front tow-hooks,
now you can. If you even spend a little time off-road you
should equip your vehicle with tow-hooks for your safety and the
safety of others. Trying to strap off the springs or around
the brake lines on the frame is dangerous. Have
you ever been stuck and needed a front-end pull and couldn't get
it? Ever had the need to pull someone from the front and couldn't?
Well, if you couldn't before, because of lack of front tow-hooks,
now you can. If you even spend a little time off-road you
should equip your vehicle with tow-hooks for your safety and the
safety of others. Trying to strap off the springs or around
the brake lines on the frame is dangerous.
Although FSJ's
can have different equipment options, they all share one same sad
feature: Nowhere to install front tow-hooks!
With this Tech
Tip, you will be able to install tow hooks on the front of most
FSJ's around 1974 and up equipped with stock bumpers and even some
aftermarket bumpers. (I believe the earlier FSJ's did not have protrusions
at the front of the frame). Following this procedure will take some
work, some thinking and a little bit of effort, but it is still
a hell of a lot easier than fabbing a new bumper, and definitely
cheaper than buying a new bumper.
Special Warning!!!
The instructions
listed here involve some disassembly and welding to the frame. The
tow hook will be bolted to an assembly added to the frame, which
could be expected to accept a force equal to the weight of your
vehicle. This modification should only be attempted by an experienced
welder/fabricator. Do not shortcut these instructions. These instructions
should be done one side at a time and please read all instructions
prior to starting the project.
Materials
List:
- 3/16"-1/4"
thick plate steel at least 16" X 16"
- Misc. nuts
and bolts as needed, this varies by vehicle - grade 5 or
higher
- One set
of tow hooks (the best types have clips to hold a strap or chain)
- Bolts for
tow hooks if not included and locking nuts for bolts.
- Your favorite
frame paint.
- Magic marker.
(color choice is open, but black seems to work pretty good)
Tools:
- Welder (we
used a mig welder, but you can use anything that will do the job.)
- Metal cutting
tools, grinder, file
- Wrenches/sockets
- Good drill
with large bits
- Face/eye
protection
- Gloves
- Helper
What to Do:
Examine bumper
and determine if it is straight and how it is oriented to frame.
Make a mental note of this for later. Look under bumper for
where the framehorns extend out from the rest of the frame rectangle.
The horns are sort of in an L-shape. If these are not present, than
you will not be able to perform this procedure as written. The bumper
is usually mounted to a bracket bolted to the outside of the horn.
With the marker, make a mark on either side of the horn on the bottom
of the bumper. Also mark about where the bottom of the horn
meets the bumper. This is to guide a cut you will make later
on the bumper.
Remove the bumper
from the brackets. The bolts are probably rusted, so don't
be surprised if you break one or more.
Remove the bumper
mounting bracket(s) from the frame horns.
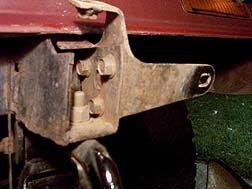 What
you should have left is an L-shaped frame extension. Cut a
section of plate to match the top of the base of the L. (the horizontal
section). This piece will probably be around 2" X 3".
Weld this to the top of the bottom portion of the L. This
will reinforce the mounting surface for the hooks. Make sure
that it is secure and stitched on all four sides. What
you should have left is an L-shaped frame extension. Cut a
section of plate to match the top of the base of the L. (the horizontal
section). This piece will probably be around 2" X 3".
Weld this to the top of the bottom portion of the L. This
will reinforce the mounting surface for the hooks. Make sure
that it is secure and stitched on all four sides.
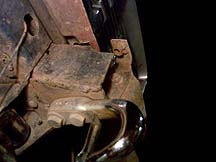
Cut another
section of steel about 3" X 3". This will be used to turn
the "L" into a "U". You may need to notch the plate at the
top for clearance to the bumper. Weld this vertical section
at a slight angle into the "U" for a little extra bracing, keeping
in mind that you will need enough opening at the top to reach in
and hold the nuts for the hooks.
After grinding
and cleaning your welds, hold the hooks up to the bottom plate and
mark where you will drill the mounting holes. Don't
forget: the nuts should
be centered in the channel once you drill the holes, and the bolts
should be centered in the field of the plate, not to far back against
the frame and not way far out on the edge of the horn. You'll
also need to visualize how far out the hook will stick out from
the bumper after you notch it.
 After
you drill the holes and are sure that you will be able to get the
brackets and hooks to bolt up, STOP! Instead of bolting it
together right away, stop, clean and spray the frame horn a nice
coat of your favorite rust-inhibiting paint. After the paint
gets moderately dry, bolt the hook in using plastic locking nuts
or some other type of locking nut. You don't want this thing
to come loose, and you donít want to have to take the bumper
apart to retighten it. Double check that you will have tool clearance
to reinstall the bumper. (On mine I had to tack weld the nut
to the bracket for the top bumper bolt and replace the carriage
bolt.) Install the bumper bracket. After
you drill the holes and are sure that you will be able to get the
brackets and hooks to bolt up, STOP! Instead of bolting it
together right away, stop, clean and spray the frame horn a nice
coat of your favorite rust-inhibiting paint. After the paint
gets moderately dry, bolt the hook in using plastic locking nuts
or some other type of locking nut. You don't want this thing
to come loose, and you donít want to have to take the bumper
apart to retighten it. Double check that you will have tool clearance
to reinstall the bumper. (On mine I had to tack weld the nut
to the bracket for the top bumper bolt and replace the carriage
bolt.) Install the bumper bracket.
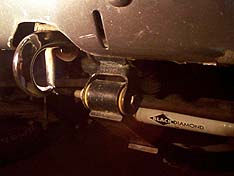
I don't feel
the necessity of turning the "U" into a completed box. Someday
you may have to replace the hook or get to the bolts again.
Quite frankly, if done well, the hook will be plenty strong. With
this setup, my nearly 3 ton vehicle has been winched up out of a
canyon with only a slightly bent tow hook to show for it! If anything,
I might recommend reinforcing the existing vertical plate on the
"L".
 After
both sides have been formed, get the bumper as close to the mounting
holes as possible and eye ball just how far up the hook goes up
the bumper face. Using the marks you made earlier cut a vertical
section out of your bumper from the bottom up to this level.
Remember that it is always easier to cut more than put metal back
on. At some point, you should have a vertical rectangle from
the bottom of the bumper to just over the top of the hook.
After this happens, flare the cut out so that you will have finger
room to attach to the hook and enough room that a strap will not
be easily cut. Deburr the edges of the cut or even file them smooth
if possible. Don"t forget that sometimes you may be pulled from
the side or at a weird angle. After
both sides have been formed, get the bumper as close to the mounting
holes as possible and eye ball just how far up the hook goes up
the bumper face. Using the marks you made earlier cut a vertical
section out of your bumper from the bottom up to this level.
Remember that it is always easier to cut more than put metal back
on. At some point, you should have a vertical rectangle from
the bottom of the bumper to just over the top of the hook.
After this happens, flare the cut out so that you will have finger
room to attach to the hook and enough room that a strap will not
be easily cut. Deburr the edges of the cut or even file them smooth
if possible. Don"t forget that sometimes you may be pulled from
the side or at a weird angle.
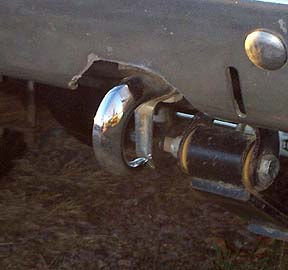
After you get
all this done, reattach the bumper and double check that everything
is tight and has some clearance.
Go wheelin'
- and after your first trip double-check that everything has stayed
tight.
David Nothstein
 
|
